![]()
Paper-Based Records
The information presented in this section includes:
- Storage Boxes
- Using Folders
- Writing Notations on Textual Records
- Using Polyester L-Sleeves
- Unstable and Acidic Paper Records
- Records with Tears and Records Torn Into Multiple Pieces
- Folded Records
- Rolled Records
- Fastened Documents
- Maintaining Association When Fasteners Must be Removed
- Records with Tape and Adhesives
- Oversize Paper-Based Records
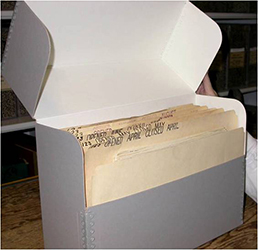
Storage Boxes
Paper-Based records are typically stored in boxes. Determine if an existing box will be retained, or if a new archival box is needed to protect the records. Retain older boxes that continue to support the records.
Reinforce a box with minor tears that is otherwise capable of supporting the records with a clear pressure sensitive acrylic packing tape.
- Only use tape on the outside of the box.
- Select a clear pressure sensitive tape with a polypropylene carrier and a methacrylate adhesive, such as J-Lar® tape.
Replace a box that is:
- physically damaged, weak, brittle, or discolored to dark brown and no longer capable of supporting or protecting the records;
- reused from another non-archival purpose, such as one previously used to store food;
- previously water damaged, infested with pests, soiled, or otherwise inadequate for the intended purpose.
If a new box is needed, use one that meets NARA specifications.
Consider writing the identifying information directly on the box in pencil. When needed or preferred, use an adhesive label that meets NARA specifications instead of an office-quality label.
Select a box large enough to hold the records without having to add additional folds, or having to roll or bend records to fit into the box.
If a standard letter or legal-size box will not accommodate the records, use a custom-sized box.
Ensure that the box is not overfilled or underfilled.
Avoid packing records so tightly that they put pressure on each other and make retrieval difficult. Damage can happen when records are forced in or out of a box.
Records bend and slump in an underfilled box, eventually becoming curved and distorted.
- Use a corrugated acid-free spacer board in an underfilled archives box to keep records upright. A slight gap of two inches or less that allows a gentle curve is acceptable; use a spacer board to prevent significant curl and bending.
- Fold the spacer board along the score lines at each end, making sure to use the score lines that are equal on both sides, and position it at the back of the box to support the folders. Use a spacer board sized appropriately for either a letter or legal sized box.
- The well created between a spacer board and the back of a box can be used to store three-dimensional items, such as medals or cased photographs, associated with the textual files.
Using Folders
Paper-Based records within a storage box are typically organized and protected in folders or other enclosures.
- When unbound documents are loose in a box, use enclosures such as letter or legal size folders, subfolders or envelopes that meet NARA specifications.
- Replace any existing folder that is too small or so damaged that it fails to support the records. Make sure records do not extend beyond the edge of the folder as any overhanging edges will be vulnerable to damage.
- Consider replacing folders and enclosures, wrappers, and dividers that are of obvious poor quality. Kraft paper and colored papers are especially problematic because they are acidic, unstable and contain water-sensitive dyes that can run when wet. Ask the project supervisor if replacing folders is included in the project.
- Align documents in the folder or enclosure neatly so they will support one another. Edges or corners of documents that are out of alignment and extend beyond the enclosure are easily bent, broken, or torn.
Avoid overfilling enclosures.
- Use the score lines provided on the folder as a guide to determine the number of items that can safely be placed within the folder.
- The stack of documents should be no thicker than the broadest width (typically ¾”) of the scored folder. Records may fall out of an overfilled folder or envelope or they may be handled too roughly when attempting to use and transport them.
- Make sharp creases along the selected score lines using a bone folder. The section(s) between the creases will sit flat in the bottom of the box and support the records.
- Do not create additional score lines to make a folder accommodate more documents. This will shorten the front cover and leave records exposed to damage.
- Please refer to the Guidelines for Folders sheet.
Use pencil to write labels directly on folders.
- Use a No. 2 pencil to label folders and enclosures instead of any type of ink pen to avoid accidentally marking a record with ink that cannot be removed. Most commercially available felt tip and ball point pens do not meet archival specifications because they contain water-soluble inks that run when wet, fade over time, and are acidic.
- If permanent notations on the folder such as declassification markings are required by law or regulation, use pens or stamping ink that are waterproof, resistant to fading, non-acidic, and meet Art and Creative Materials Institute (ACMI) non-toxicity standards Approved Product (AP) Seal.
- Avoid using office-quality adhesive labels that may fall off as they age, leading to loss of information. When a pressure sensitive adhesive label is needed, select labels that meet NARA specifications.
- Follow standard protocol regarding required identifying information and its preferred location on the folder tab.
Writing Notations on Textual Records
Adding any notation on an archival record is a significant decision.
- Never write directly on an archival record without the concurrence of an archivist and only if it is part of the project plan for processing the records.
- Write authorized notations as neatly and unobtrusively as possible, and enclose them in brackets [ ] to indicate that the information was added by the archives, not by the originator.
- Whenever feasible, add notations on the reverse, not the front, of the document.
- Use a No. 2 graphite pencil to add approved notations. Never use ballpoint, felt-tip, or similar pens.
- Most pens use acidic inks that fade over time and are water-soluble and will run when wet.
- Some markers use permanent ink so a notation can never be removed even if it is incorrect or becomes obsolete.
- If ink is required to stamp or mark archival records, for example with declassification notices, use an ink that is waterproof, resistant to fading, non-acidic, and meet Art and Creative Materials Institute (ACMI) non-toxicity standards Approved Product (AP) Seal.
Using Polyester L-Sleeves
Protect a very brittle, badly torn or otherwise fragile record during handling with a polyester film sleeve sealed along two adjacent edges, commonly called an “L-sleeve.” Consider placing smaller documents that could be overlooked or damaged in an L-sleeve.
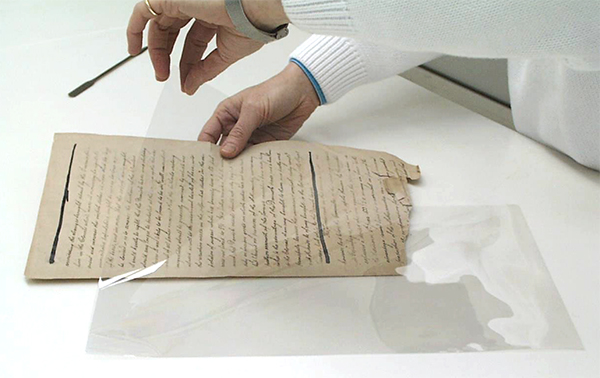
Polyester L-Sleeve
This type of enclosure is recommended for a variety of damaged or unstable original records.
Only sleeve a damaged record that needs extra support for safe handling, or a smaller item that could become lost, overlooked, or misfiled when left loose among other larger records.
- Consider the additional storage space needed if the accumulated thickness of multiple polyester sleeves requires a second storage box.
- Note badly damaged records that cannot be protected adequately with a sleeve using standard protocol. Withhold from researcher use when necessary and contact a conservator regarding conservation treatment.
Insert one single-page document into a polyester L-sleeve. If several pages are placed together in a single sleeve, they must be removed for viewing and this can cause additional damage to fragile records. Remove fasteners from multi-page documents that require sleeving, and sleeve each page individually.
Polyester film generates static electricity that can displace some types of media. Certain types of media can offset onto plastics. Do not use plastic sleeves with records containing loosely adhered media (e.g., charcoal, pastel), thickly applied; waxy or oily media (e.g. oil pastels), or flaking media.
Always use a polyester sleeve that is at least ¼ to ½ inch larger than the document. Any edge that extends beyond the sleeve will be damaged. For example, only use a letter-sized sleeve for a sheet that is standard 8½ x 11 inch letter size or smaller.
- Multiple sizes of L-sleeves are available. Select one or more sizes to accommodate the size of the documents found in the project.
- Do not overlap multiple sleeves to enclose an oversize document. Discuss options for custom sleeves or encapsulation with a conservator.
Position the document so that the two sealed edges of the L-sleeve align with the left and bottom edges of the sheet.
- When looking at the front of a sleeved document, the top and right edges of the L-sleeve will be open. This ensures protection during storage and handling and reduces the chance of loose fragments falling out of the sleeve.
- Position the long-sealed edge of the sleeve at the fold (bottom) of the folder.
Use special care when inserting a damaged document into a polyester sleeve to prevent additional tears and breakage.
- Minimize the static electricity that can make it more difficult to insert the record by holding the bottom sheet of the sleeve flat, lifting up the top sheet, and inserting one hand between the two sheets.
- When sleeving a very fragile or thin tissue-like document, first place it on a sheet of archival bond paper to help ease the document into the sleeve. The archival bond paper can be removed afterwards.
- If the document has information on only one side, leave the bond paper in the polyester sleeve for extra support.
Maintain order of sleeved photographs using a subfolder. Alternatively several polyester sleeves can be fastened together with a paper clip to maintain records in the proper sequence. Place documents in the sleeves, and position the paper clip so it comes into contact only with the sleeves, not the records inside.
Once a damaged record is placed in a sleeve, it should not be removed for viewing. Leave the record in the sleeve for handling, research, and digitization.
Please view the following short video, "Placing a Document in a Polyester L-sleeve" (no sound):
Unstable and Acidic Paper Records
Consider reformatting highly acidic archival records and those produced using processes known to be highly unstable by photocopying them or digitizing and printing out a copy onto archival bond paper.
Mimeograph
Research shows that mimeographs can be stable if they were created on non-acid paper. If the document is brittle or highly discolored, consider reformatting through digitization or copying.
- Create a facsimile by photocopying the record or digitizing it and printing out a copy onto archival bond paper.
- Place the facsimile in the appropriate arrangement location.
- Consult the project supervisor and follow standard protocols for identifying the facsimile as a copy, and about removing, relocating, or discarding the original record.
Acidic and Brittle Records:
- Acidic papers may become so brittle and weak over time that they are difficult to handle without breaking off pieces. Highly acidic papers can also stain and degrade other records they are in contact with.
- Consider making a facsimile of documents produced on highly acidic paper such as newspaper clippings and telegrams.
- Alternatively, support and segregate a highly acidic record by placing it in a polyester sleeve, between archival bond paper, or in an archival bond subfolder.
- Beginning in November 2001, records received as mail addressed to government offices in certain Washington, DC, zip codes may have been irradiated to kill biohazards. Records exposed to this process are brittle and discolored and should be reformatted. For additional guidance see Frequently Asked Questions About Irradiated Mail.
- Remove non-record, loose, acidic inserts (such as cross-reference forms, withdrawal forms, or blank place-holders) left among archival records.
- Photocopy or digitize and print out any insert that contains important archival information onto archival bond paper, or hand-copy the information onto stable paper or card stock.
- Consult the project supervisor about removing, copying, or discarding inserts.
- Alternatively, protect a brittle record that is difficult to handle without causing damage by placing it in a polyester L-sleeve.
Records Produced Using Highly Unstable Processes:
A detailed discussion on the stability of the various processes used to produce paper-based records is beyond the scope of this guidance. Identifying the specific process used can be difficult. General guidance is provided focusing on some of the most unstable processes.
- Consider reformatting any record becoming illegible due to fading media or other instability, if possible. Reformatting will preserve the best possible copy of the information if the record continues to become illegible.
- Arrange the facsimile in the appropriate location. Discuss whether copying such records is part of the project with the project supervisor and follow standard protocols for identifying the facsimile as a copy, and about removing, relocating, or discarding original records.
- Carbon copy records and mimeograph records are relatively stable if they are produced on non-acidic paper. Consider reformatting these records if the paper is brittle and degrading.
- Consider reformatting carbon paper records that can contain PCBs (polychlorinated biphenyls) and BPA (bisphenol A). Always wash your hands after handling these records especially before eating or drinking.
- Consider reformatting light-sensitive “ditto” records produced using ditto split-duplication. Limit any light exposure because they can fade quickly.
- Thermal paper (original patent 1947) was commonly used in fax machines from the 1950s to the 1980s and is still used to produce cash register receipts. Some types of thermal paper are unstable and the information has become illegible.
- The stability of thermal papers varies on the method of producing the image and the types of paper used. Signs of deterioration in thermal papers include darkening of the paper and fading of the information. Consider reformatting any record suspected of being produced with poor quality thermal paper and consider discarding the original. See NARA Bulletin 96-03 Preservation of facsimile transmissions that are Federal records.
- Since the 1990s most fax machines have used inkjet technology to print on plain paper, which is a much more stable technology.
- Xerography produces stable documents, depending on the quality of the paper used. Plasticizers in some plastics can cause toner transfer so avoid housing Xerographs or “Xerox copies” in plastic sleeves or notebooks. Polyester sleeves are acceptable. If records need to be retained in a notebook place a piece of bond paper between the front sheet and the notebook to prevent transfer.
Records with Tears and Records Torn into Multiple Pieces
A record with minor tears, especially tears along the edges which do not extend into the text, can be handled safely with care and does not require any preventive measures.
When handling a record with more extensive tears that compromise the integrity of the sheet, place it on a sheet of archival bond paper to provide added support. Consider using a polyester L-sleeve to protect a vulnerable record, especially if it is highly significant.
- When one or more tears extending across a significant portion of the paper may advance even with careful handling, use an L-sleeve to support the record and prevent it from tearing in two or more pieces.
- See Using Polyester L-sleeves for additional guidance.
Discuss options to protect a record torn into two or more pieces with a conservator.
- An L-sleeve is usually not a good option for a record torn into two or more pieces. The pieces can move in the sleeve and cause additional abrasions, breaks, and losses along the torn edges.
- If conservation assistance is not available, house the torn record in a folder with sheets of archival paper between the pieces.
Torn Textual Records
Left: This is an example of a document that is torn in multiple areas along crease lines. Center: This is a bound volume where the pages are torn from the binding. Right: This is a document that may not be appropriate for a polyester L-sleeve. Instead, house the torn record in a folder with sheets of archival paper between the pieces.
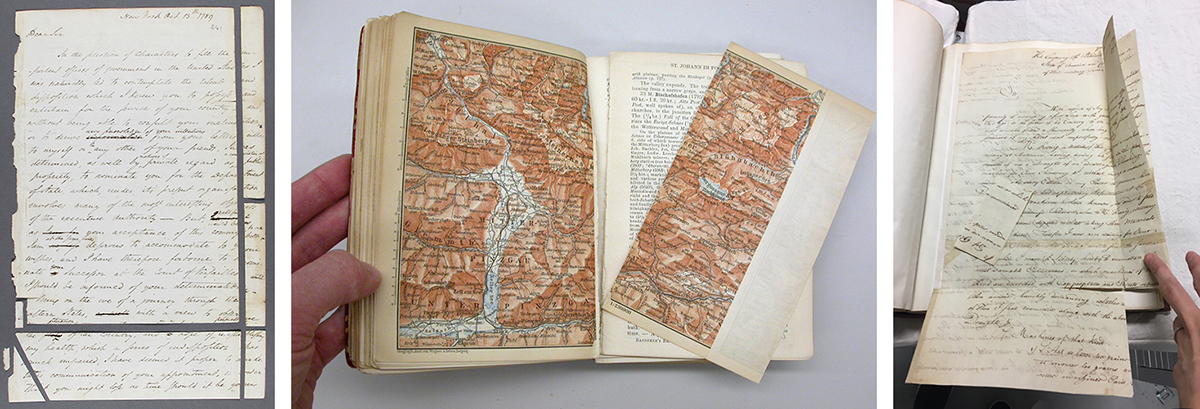
Folded Records
Open folded documents carefully, only if the paper is strong and flexible and if it is clear that the documents will not break or crack along the fold lines.
- Folded documents that can be safely opened for access can be stored in their folded format especially if the records are used infrequently. Ask the project supervisor if routine unfolding of records is part of the project.
- Ease open a folded document on a flat work surface. Once unfolded, position the document with the peaks of the folds facing up. Then gently smooth out the folds with a fingertip. This technique will not flatten out the paper perfectly, but will permit the document to be placed in a file folder.
- Avoid “popping” open a fold and do not back-fold documents to flatten them.
- Leave a record that resists gentle action or that is stiff, brittle, or badly damaged folded.
- Discuss options to have them humidified and flattened under controlled and properly supervised conditions with a conservator.
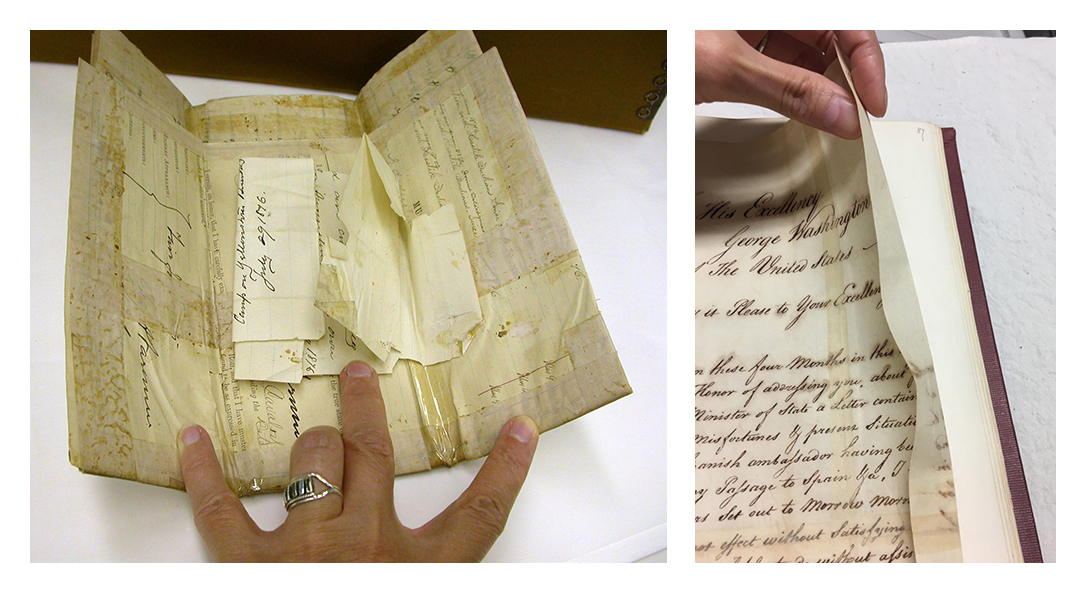
Folded Documents
Left: This is an example of a folded document with many additional preservation problems such as tears and adhesive tape. Right: This is an example of a document that has been creased and folded to fit into a ledger volume.
Rolled Records
Rolled records can present challenges for handling and holdings maintenance.
Assess if it is safe to unroll a document.
- Unrolling a document, especially if the paper is weak, stiff, or brittle, may cause the document to break, tear, or develop sharp and permanent creases.
- If the paper is too brittle or curled to allow safe handling, discuss appropriate humidification and flattening with a conservator.
If it is safe to do so, the best option is to unroll the record and store it in an archival folder housed in a flat drawer or a flat box. Discuss techniques to unroll a document safely with a paper conservator.
- Smaller records can be stored upright in an archival box larger than the unrolled record. Avoid undue pressure that may break the paper.
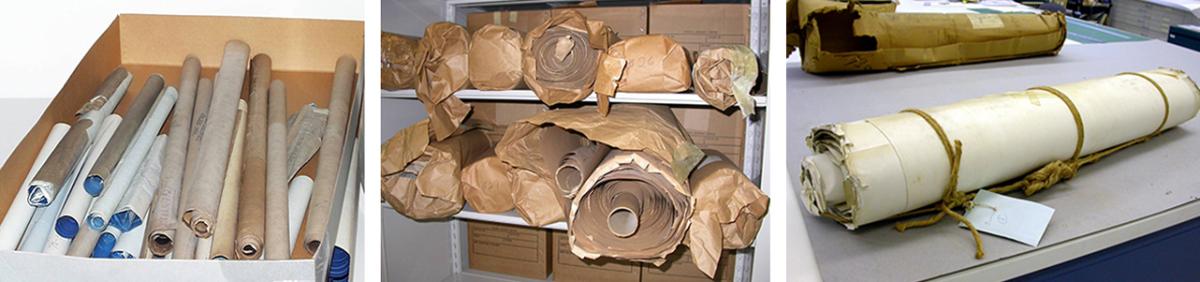
Rolled Records
Left: Blueprints and architectural plans are often rolled. Center: Oversize records are often rolled onto tubes and housed on shelves that are too small. Right: Large numbers of rolled records may be tied together, making the record bundle heavy and difficult to access.
If a rolled record is too large for available flat storage when it is unrolled, re-roll it around an acid-free tube. The tube will prevent crushing and protect the edges.
- Always roll documents around the outside of a tube. Never put rolled documents inside a tube for storage: inserting them and removing them will cause damage.
- Wrap the rolled document with acid-free paper, then polyester film as an outer wrapper, to protect it from dirt, light, and moisture. Secure the outer wrapper with cotton twill tape tied loosely enough to avoid crimping the document.
Please refer to the document, Rolling Oversized Records.
Fastened Documents
A variety of methods have been used to attach multi-item historic and official documents together. The associations these fasteners provide are significant and must be maintained.
Historic or Official Fastener
Historic methods of attaching associated records include the use of ribbon, thread, string, and pins. Ribbon lacings and ties sometimes include associated wax seals. Documents may be held together by adhesive wafer seals, paper strips glued onto the documents, or wax seals.
- Do not remove historic or official fasteners used to associate records.
- If documents fastened together in these ways must be separated for safe handling, access, or imaging, send them to a conservation laboratory. Conservators can separate the documents without damage or loss of information and without damaging seals or wafers crucial to the integrity of a document.
Office-Type Fasteners
Staples, paper-clips, binder clips, metal slide fasteners, and similar office-quality fasteners do not need to be removed unless they are obscuring unique information, or they are causing additional damage to the records.
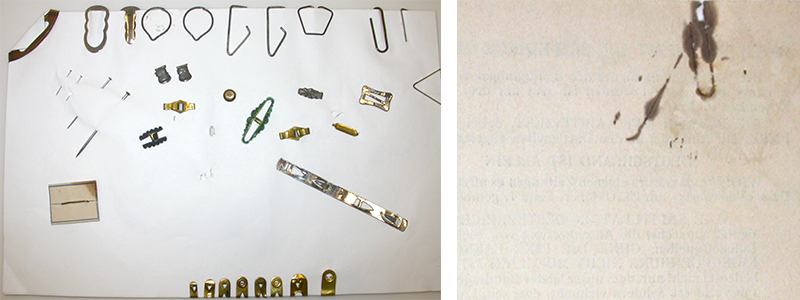
Fastener Types and Deterioration
Left: Office-type fasteners are often made of metals that corrode or plastics that degrade and may need to be removed. Right: This image shows staining caused by a rusting paper clip.
- Unless there is a reason to remove it, it is usually safer to leave a fastener in place. Removing a fastener can cause damage and is often unnecessary to use the record.
- When office-quality fasteners must be removed, replace them with more stable alternatives, store the associated records in a subfolder, or otherwise maintain their original association and order.
- Remove fasteners when they are preventing access to unique information. For example, remove a fastener that is preventing top sheets from being rolled back enough to view unique information. Also remove or reposition fasteners located over or through unique information.
- Remove fasteners that are actively causing damage to the records. Some fasteners are so tight that they deform records and make it difficult to roll back pages without tearing the paper. Minor rust is not a concern but heavily rusting staples may break resulting in lost associations; depending on their location rust may damage unique information.
- Consider removing fasteners on very heavily used collections, records of high intrinsic value or before a digitization project. Frequent, repeated rollback of top sheets can damage the area along the fastener and cause areas of the record to break off, especially if the paper is brittle or thin.
- Remove rubber bands and maintain association with a paper clip or a subfolder. Rubber bands deteriorate over time, becoming so hard and brittle that they break apart and no longer serve their function. Pieces of brittle rubber can become adhered to a record, and loose pieces can abrade surfaces.
- Avoid rolling off the rubber band. Cut the rubber band to prevent damage to the record.
- Remove brittle pieces of a rubber band stuck to a document unless doing so pulls off paper fibers. If the paper is in good condition a micro-spatula can be used to flick off brittle pieces.
- Use folders or subfolders to maintain association of bundles of records tied together with colored cloth tape or string. The ties can cut into the paper and tying and retying is difficult without causing damage to the records.
- Cut the ribbon or string instead of sliding it along the records. Sliding will break and abrade edges of the records.
- Evaluate unusual fasteners such as straight pins and remove only if necessary to access information or to prevent damage to the records during use.
- Do not attempt to separate records that are glued or otherwise adhered together.
- Ask the project supervisor if removing records from binders and notebooks is part of the project plan.
How to Remove an Office-Type Fastener
- Use a micro-spatula to remove fasteners. Always fully support the record on a table when removing a fastener. Place one hand on the record to hold it in position while removing the fastener with the other hand.
- Work from the back of the record using the micro-spatula to lift each leg of a staple or loosen a tight paper clip.
- Encrusted rust can make it harder to remove the fastener. Use a micro-spatula or tweezers to chip away at the rust and break its contact with the paper. Work gently with light pressure to avoid tearing or skinning the paper. Then remove loose particles with a small soft artist brush.
- Slip the corner of a small piece of polyester film under the fastener before lifting the legs or attempting to chip away rust. This will prevent the micro-spatula from cutting into the paper.
- Hardened and encrusted rubber bands may also be removed using a micro-spatula or tweezers to gently lift the encrusted pieces.
- Place removed fasteners in a paper cup or similar container to prevent accidental damage to records from the discarded fasteners.
- Tight fasteners such as grommets or heavy-weight staples can be so firmly embedded in the paper that attempts to remove them will damage the paper. If they must be removed for access purposes, discuss options with a conservator.
Please review the following video, "Removing a Staple" (no sound):
Maintaining Association When Fasteners Must be Removed
Use stainless steel paper clips and a folded strip of good quality paper to hold associated archival records together.
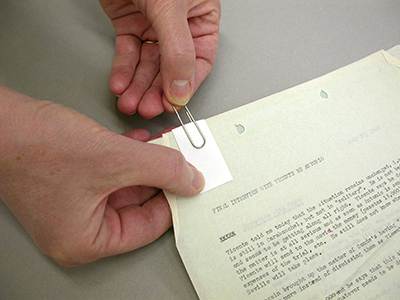
Good Practice for Maintaining Association
Use stainless steel paper clips and a folded strip of good quality paper to hold associated archival records together.
- Place folded strips of archival bond paper (ca. 1" wide and 3" long) over the top edges of the documents to support the paper clip. Slide the paperclip over the paper strip.
- For multiple groupings of papers in one folder, place paper clips at different points along the top edges of different groupings of associated records. Positioning paper clips in the same area on multiple groups of records creates accumulated bulk that will distort the paper.
Use stainless steel staples when the paper records are strong and flexible and that do not need to be separated for future access, like for digitization.
- Punch staples through strips of archival bond paper as described above, to help support and protect the documents.
- Do not staple records of high intrinsic value or if the paper is weak, thin, or brittle.
When paper records need to be grouped together but are too fragile for the pressure of paper clips or staples, or are used regularly, place them in a folder or subfolder made of archival bond paper. A sheet of 11" x 17" archival bond paper can also be folded in half and used as a subfolder to maintain associations within a folder.
Never use fasteners on photographs, posters, or original artwork. Fasteners can permanently damage the image layer of these formats. Maintain associations with folders or subfolders.
Records with Tape and Adhesives
Never use tape on any record in an attempt to repair a tear, maintain an association, or for any other purpose.
- No adhesive tape meets conservation standards, even those advertised as "archival," so never attempt to mend documents with pressure sensitive tape or any type of adhesive.
- Over time adhesives migrate into, embrittle, and stain the paper.
- Solvents in the adhesive can cause inks to bleed.
- Tapes shrink and distort, and as the adhesive fails over time, the carry strip peels so the tear or addition is no longer held together.
Although tape found on a record will damage it over time, do not try to remove it.
- The solvents and techniques needed to remove tape and adhesives varies depending on the type of tape used, its age and degree of deterioration.
- Conservation treatment to remove pressure-sensitive tapes is difficult, and sometimes impossible, even for highly trained conservators.
- Unskilled attempts to remove tape will likely tear the paper, damage information, and leave sticky residues that affect adjacent records.
Post-it® Notes and similar sticky notes often become difficult to remove over time and can lift information.
- If a sticky note covers unique text, consider repositioning it over an area without information, if the note detaches easily. Do not force the note to detach.
- If a note obscures unique information but the position of the note is significant, record the original location by photocopying or scanning and printing out a copy of the page before moving the note.
- If there is insufficient blank area to reposition the note on the record, place it in an L-sleeve located before the associated record. If a repositioned note appears to adhere weakly, consider attaching it to the page with one stainless steel staple.
- Discuss the expectations for the project with the supervisor and follow standard protocols.
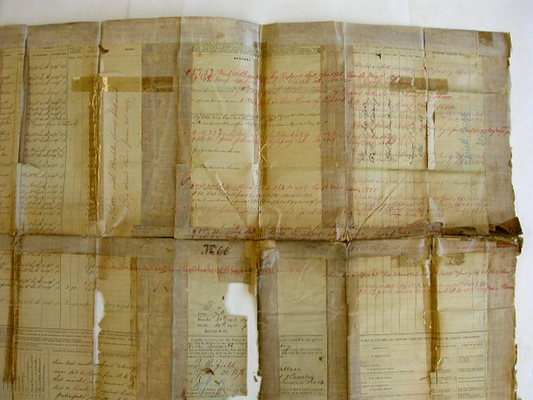
Oversize Paper-Based Records
“Oversize” describes any record that does not fit into a standard-sized folder, box, or other container without being rolled or folded.
Large paper records such as maps and posters are awkward and often require two people for safe handling. Always use a folder or other support and a cart to transport large records.
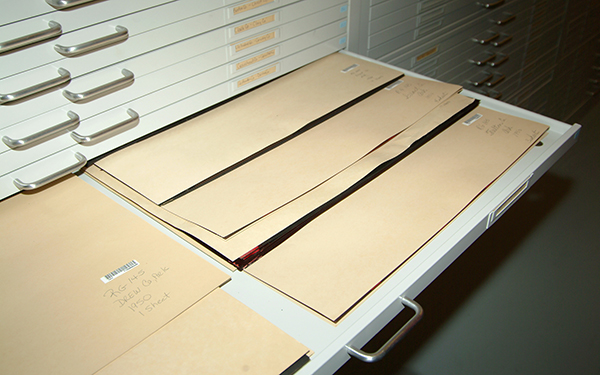
Oversize Records in Drawers
It is preferable to have large, unrolled paper records housed in folders and stored in drawers.
To flip an oversized record over, place it in a file folder and turn the folder over supporting the folder with one hand on top and one on the bottom. Very large records may require two or more people to flip over safely.
Oversize paper-based records become creased, torn, curved, pleated, distorted, or otherwise damaged when housed in enclosures, boxes, or drawers that are too small.
Do not trim, cut, or section oversize records to make them fit into enclosures or storage containers.
When possible, store oversized records flat, without rolling or folding.
- House one or several records in a folder larger than the record; avoid overfilling any one folder. Consider using unbuffered archival folders to house blueprints which are sensitive to higher pH levels.
- Arrange folders in flat map case drawers or in oversize archival boxes that will fit onto shelving.
- Ensure that the drawer or box is large enough to accommodate the size of the records.
- Follow established cross-reference procedures when relocating an oversize item from its associated collection.
Sometimes it is impractical to provide separate storage for records in good condition that are only slightly larger than the box or container.
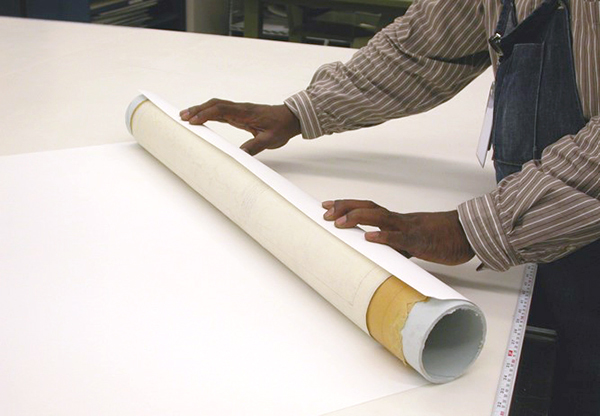
Rolling Oversize Records
This shows the proper technique for rolling oversize records onto a tube.
- If already folded, refold along the existing fold line.
- If the paper is strong and flexible, make a single fold in the document to allow it to fit into its container.
- Evaluate the best location to make a new fold. If possible, fold in a blank area without information. Do not fold across the middle of a line of text or other information.
- Do not fold significant records of high intrinsic value, brittle records, photographic materials, posters, or original artwork.
When flat storage is not available, another storage option is to roll oversized documents onto an archival tube.